Tag: How To

  • HOW TO – DECORATE A BOOKCASE

    HOW TO – DECORATE A BOOKCASE

    My bookcase has been a constant saga of reorganization and frustration {see here and here for the journey}… it was cute, but it wasn’t quite right.  So I decided to take a day and revamp the shelving decor.  Read on and you can learn how to take some ordinary shelving and make it something all your own.

    So, my bookcase was ooooookay {yawn}… but it wasn’t there yet.  I had already saved this bookcase from being sent to the dump {it used to be a horrible brown spotty wood color… I painted it glossy white and papered the back with a pink and white damask print}.  If it was worth saving, then it should be worth filling properly.  As I do with every design project for my company {if you’re curious about what I do, click here}, I start with an Inspiration Board {which is basically a collection of images that inspire me and helps collect my thoughts and direct my ultimate design vision}.


    *images courtesy of elements of style, the zhush, all things chic, and favim

    After looking at my Inspiration Board for design direction on my bookcase project, I started laying out all of my necessary decor items… namely books, framed photos, and miscellaneous knick-knacks/pretty things/sentimental items.

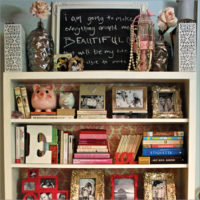
    The final step in the process is arranging all of the items so that they are aesthetically pleasing.  This involves a bit of trial and error and a lot of walking back and forth {so you can see what your arrangement looks like from different areas in the room}.  My final product {I am in love with it} looks like this…

  • FABULOUS EVENT – THE PERFECT GIRLS’ WEEKEND

    FABULOUS EVENT – THE PERFECT GIRLS’ WEEKEND

    If you read my packing article earlier this week {found here}, you may have wondered exactly what I was packing for… I was packing for a girls’ weekend.  There is a common misconception that a girls’ weekend has to be all about boys and partying {and, yes, that can be a fun weekend…}, but what can be even more fabulous {and refined} is a more relaxed version of that weekend… a weekend of sunshine, food, poolside cocktails, shows, and treating yourself {or being treated} like a princess.  Another positive: instead of ending the weekend exhausted and hungover {a sad side-effect of the boy-chasing shot-pounding girls’ weekend}, you end the weekend refreshed, tan, and utterly pampered.

  • HOW TO – PACK FOR A WARM WEEKEND

    HOW TO – PACK FOR A WARM WEEKEND

    Going away for a three-day weekend… especially someplace warm… is always something to look forward to.  Packing for it? Not so much.  There is very little about this article that is glamorous {except for the fact that I’m packing for a long weekend in Palm Springs}… but this is a practical skill you should master.  You’ll need outfits for the pool, daytime shopping/outings, nighttime dinners/going-out, working out {if you’re like me and view exercise as relaxing}, and sleeping.  Follow the step-by-step packing guide below and you’ll never feel overwhelmed by packing again {no need to stress before a vacation!}.

  • MUST HAVES – MAKEUP

    MUST HAVES – MAKEUP

    I think that makeup is the bee’s knees.  It has the power to enhance or transform.  To empower and seduce.  To project innocence or confidence.  {view my 5-Minute Face and Advanced Makeup tutorials here and learn how to achieve the perfect pout here}. I’ve had inquiries as to exactly what makeup products I use, what I can’t live without, and what I give my stamp-of-approval to.  I decided that I would answer these questions in the most honest way possible… by dumping out my makeup bag {the one that holds my essentials… not the makeup train cases that I have filled with fun colors and rarely used products} and then listing exactly what was in that bag.  With this combination of products, I have been able to achieve every necessary look {and they all fit into one Betsey Johnson makeup bag}.  As you’ll notice, some of the products are a bit pricey and some are only a couple of dollars {love it!}.  All of the products are f.a.b.u.l.o.u.s.

    The Tools
    1. M.A.C. 168 Large Angled Contour Brush $32
    2. M.A.C. 239 Eye Shading Brush $25
    3.M.A.C. 217 Blending Brush $23
    4. La Cross Eyelash Curler $3
    5. Bare Escentuals Full Coverage Kabuki Brush $28
    The Foundation
    6.  Maybelline Cover Stick Waterproof Concealer in Light Beige $5
    7.  Maybelline Superstay 24Hr Makeup in Sand Beige $11
    8. Maybelline Purestay Powder Foundation SPF 15 in Buff $8
    9. Maybelline Mineral Power Powder Foundation in Nude $8
    The Glow
    10. M.A.C. Paint Pot in Bare Study $16.50
    11.  Too Faced California in a Compact – Beach Bunny $28
    12. M.A.C. Powder Blush in Coygirl $20
    The Eyes
    13.  M.A.C. Mineralize Eye Shadow – Illusionary/Burning Ambitions $20
    14. L’Oreal Lineur Intense Brush Tip Liquid Eyeliner in Carbon Black $9
    15.  Nars Night Breed Eye Shadow $23
    16.  L’Oreal Voluminous Waterproof Mascara in Carbon Black $7
    17. Ardell Fashion Lashes Strip Lash, 120 Black $4
    18. Duo Eyelash Adhesive in Dark Tone $6
    19. Maybelline Expert Eyes Brow Pencil in Light Brown $3
    The Lips
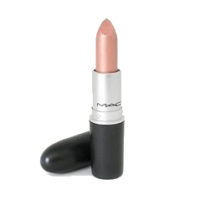
    20. M.A.C. Lipstick in Hue $14
    21. NYC Liquid Lip Shine Lip Gloss in Pink Kiss $2
    22. M.A.C. Fashionflower Lipstick $14.50
    23. M.A.C. Fashionflower Lipgelee $14.50

  • HOW TO – THE 5 MINUTE FACE & ADVANCED MAKEUP TECHNIQUES

    HOW TO – THE 5 MINUTE FACE & ADVANCED MAKEUP TECHNIQUES

    If your life is anything like mine… fabulous opportunities arise at the most unexpected times.  Though you would love to always be prepared, sometimes you will be caught off-guard {aka in your pajamas with no makeup on}.  Don’t let this stop you from taking part in the fabulous outing… if you have five minutes {trust me, any worthy individual extending the invite will wait for you, gorgeous} you can be ready to go.  Throw your hair up and remember, you only need a clean base {concealer, foundation, pressed powder}, a bit of shimmer {get a good multi-purpose color pot}, tinted loose powder {to set the look and give you a glow}, a bit of bronzer, a pop of color, and curled lashes {with a good coat of volumizing mascara}.  Read on for a how-to on your steps to achieve the 5-Minute Face.

    1. Bare faced… and have to be out the door in 5 minutes? 2. Put that concealer under your eyes . 3. Concealer? Check. Now pat it gently into your skin. 4. Liquid foundation. 5. Dot it on and rub it in. 6. Our base is done. 7. Pressed powder… Press it on for flawless coverage. 8. A two in one product to highlight eyes… 9. And cheeks. 10. Rub in some tinted loose powder with a kabuki brush. 11. Bronzer everywhere the sun hits… cheeks, forehead, nose, and chin. 12. Take the bronzer and use it with a contour brush to define cheekbones.  13. Hot. Pink. Blush. You need a pop of color. 14. Put that color on the apples of your cheeks. 15. Your eyelash curler (aka your best friend). 16. Volumizing mascara. 17. Bam. Less than 5 minutes. 18. Time to go out xo

    For the video version of the 5-Minute Face Tutorial, watch here
    httpv://www.youtube.com/watch?v=rlzdMfPGgNM

    If you’re ready to move on, lovebug… Let’s get on with some more advanced makeup techniques.  Let’s say you know you have somewhere fabulous to go {a hot date, a charity event, girls night…} and you have at least 20 minutes to get ready… advanced makeup techniques only add 15 minutes {max} onto your basic 5-Minute Face.  With the addition of eyeliner {pencil and liquid}, darker eyeshadow, fake lashes, an eyebrow pencil, and a nude lipstick, you’re ready to knock anyone’s socks off… and {though you are already perfect just the way you are} you’ll look like a total glamazon.


    1. You’ve already done your 5-Minute Face… now line the outer third of your lower lash line and inner rim with a black waterproof eyeliner pencil. 2. Voila! Instant drama. 3. Take a flat brush and rub it in light shimmery eyeshadow. 4. Pat the shadow on your lid and sweep it up to your browbone. 5. A wash of light shimmer. 6. Take an eyeshadow brush meant for your crease and sweep it in a chocolate brown shadow. 7. Sweep the shadow into your crease. 8. Back to the flat eyeshadow brush and the chocolate brown shadow.  9. Cover the outer half of your lid with the brown shadow. 10. Use a sponge tip applicator and sweep it in black shadow. 11. Put the black shadow on the outer third of your upper and lower lid. 12. Liquid liner… line your whole eye if you want a dramatic look. 13. Fill in those brows to look polished. 14. See? Polished. 15. One more coat of that volumizing mascara. 16. Fake eyelashes! Practice makes perfect. 17. The perfect nude lipstick. M.A.C.s “Hue.” 18. Smear that lipstick on. 19. The face… bring the drama. 20. The finished lids. 21. Advanced makeup… mastered.

    For the video version of the Advanced Makeup Tutorial, watch here
    httpv://www.youtube.com/watch?v=338G3WyKYRU
  • HOW TO – DECONSTRUCT & RECONSTRUCT A T-SHIRT

    HOW TO – DECONSTRUCT & RECONSTRUCT A T-SHIRT

    I was headed to the Big Four… basically a huge metal music festival where Metallica, Slayer, Megadeth, and Anthrax would be playing… and I had no idea what to wear.  My man gave me one of his cherished Metallica T-Shirts and told me to do whatever I wanted with it.  Perfect.  With the assistance of an embroidery needle, a silver Sharpie, some awesomely sharp scissors, crimson ribbon, and a safety pin… I got exactly the Metallica shirt that I wanted.


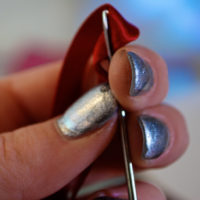
    1. Gather your supplies… T-shirt. Silver Sharpie pen. Scissors. Ribbon. Etc. 2. The beginning T-shirt… Cute, but not quite the look I was going for. 3. My “Aha!” moment when I thought… “I can make over this shirt.” 4. Using the silver Sharpie to mark where to make the cuts.  5. Close up of the Sharpie markings. 6. I like this much better… a tank top! 7. No… I don’t. I can make it even better! 8. Cut a slit down the middle… yeahhhhh. 9. Love it. 10. Only loved it for .5 seconds… decided to cut up the sides.  11. Decided to re-stich the sides with some satin ribbon.  12. Stitching myself back up. 13. Happy! That’s what I wanted. 14. The finished product. I even added a metal-esque safety pin. Love.